

Now that I've talked hubby into replacing the door fronts of my kitchen cabinetry, I am thinking through what color I want to paint them. I have a white speckled solid surface counter top that I have to work around and I definitely like the idea of a soft taupe or light grey, but after drooling over these all white kitchens from "This Old House-My Home Ideas" site, I may decide on a soft white after all. I'll keep you posted. Ken is only half finished. 10 doors down, 6 drawers to go. Enjoy these pics and I hope something in them inspires you too!
This one below is similar to my cabinet layout. I have open shelves, but they're not boxed in. I would love to swap out my beadboard backsplash for this traditional white subway tile, but baby steps here....He already gave an inch and I took more than my usual mile. :)

Look how the cabinetry is a subtle cream next to the whiter wall. Pendant lights are amazing too!

Very fun chandeliers over the island &
I love big knobs and I cannot lie.

Look at the hardware on the cabinetry! Huge statement maker!

This is my fave-below! LARGE subway tile and eat-in kitchen. Yummy!

This kitchen I spotted in my old Cottage Living magazine several years ago. I still love everything about it.

I love the rustic accents in this otherwise simple set up.

Don't love the repurposed wood here but thought the linen (burlap?) slipcovered benches were to die for.

This shade below is the color I am leaning towards for my own kitchen cabinets.
Time will tell.

Simple and stylish.Love the texture of the lights and stools.

What new projects are you working on Chumps? Let me know if I can help.
There's always Room for Change!
:)
-C
Thursday, January 31, 2013
I'm dreaming of a white kitchen...

Monday, January 28, 2013
Classy Condo
Picture OAK everywhere. Not the cool chunky custom kind either. Small, squatty and dark. This fireplace below had a small ledge for a mantle which was connected to an awkward oak built- in to the right of it. We chose a tile that had some dimension but not one that contained a lot of color. We didn't want to lock ourselves into a certain look or style. Bonnie, (Greg's cool mom--n-law and one classy chump) was going for a beachy, clean vibe and I thought this tile would allow her the freedom to play that up.
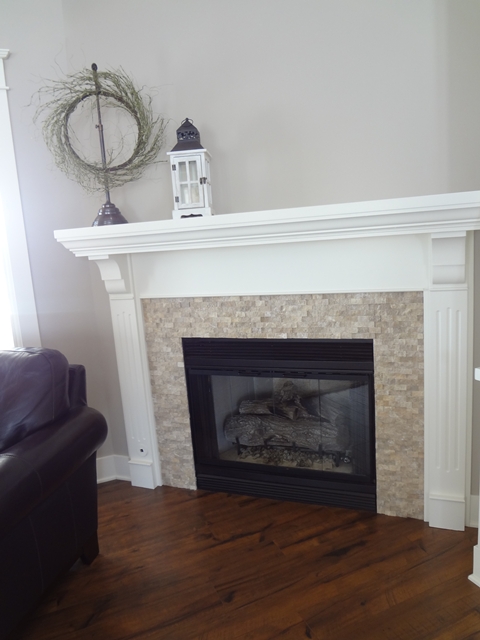
New hardwood (actually laminate!) flooring throughout. We chose a dark rustic planked look to ground the space because we knew we wanted to keep the walls light and airy. (Ben Moore's "Stone Hearth"-yes, my new- almost- overused- tried and true taupe).
Below is the new set up for the built -ins. We decided to not connect the mantel to the entertainment center and we were pleased how that defined the fireplace area much more than before. We are still in the process of finding wall art for the unfinished areas. I sent her to Hobby Lobby to look for a rectangular bird print that I saw last week that had some robin's egg blue and brown accents for above the mantel.


Here's the soft blue. We're looking at linen sofas...think white and slipcovered and comfy!
Greg remodeled this entire room...new beadboard ceiling, new flooring, windows, doors, trim, etc.
You can see the sunroom just beyond the wall sign that's mounted above the door frame.

Another shot of the sunroom. I know she's anxious to finish this room. It's so light-filled and peaceful.

Here's a shot looking through the entire space taken from the dining area.

Here's the dining area, adjacent to the great room-actually all one large space defined by area rugs. Bonnie found this table at Talsma in their clearance! Can I get a woot-woot??


Shot from the great room looking into the kitchen:
Here you just cannot appreciate the vision it took for this kitchen-thanks to Greg and crew and Marty Hulst at Integrity Cabinetry, (downtown Zeeland). We all agreed that the original wall separating the kitchen and dining had to come down in spite of potentially losing cabinet space, (which we didn't lose after all). Again, picture oak cabinets and a large obtrusive wall that ran the length of the half wall in the pic. below:


Master Bath:Again, total gut job.
We opened up the space by re positioning the shower and stool and adding a large bench area and linen closet. Props to Integrity Cabinets for a well thought out plan and beautiful charcoal custom cabinets.


Half Bath: Still in the process of accessorizing. Here we used one of my fave colors:
Edgecomb Grey, pairing it with a dark linen looking countertop.


Stay tuned for my very own mini-kitchen remodel coming up soon....remember how I was promised a new kitchen floor for Christmas?....well, let's just say that one things leads to another around here...and that there is always room for change...hee hee.
Quoting Brittany Spears, "Oops, I did it again". Husband is in the garage/workshop as I type building me new kitchen cabinet doors. :)
I think I just heard him sigh.
Love ya Chumps! Hope your week is off to a good start! Comments...
Tuesday, January 22, 2013
Gettin' Crafty
I did manage to rev up the propane and kerosene heaters twice last week and get some much needed painting done. My assistant (always supportive hubby) willingly cut me some boards to make a truckload (well almost) of signs for my booth as well, so overall, I've been feeling pretty productive, along with helping you Chumps get started on some of your new year projects!
So far 2013 is shaping up to be a nice, easy-to-manage-trying-to-keep-my priorities-straight kind of year!
(I know, I know...it's early). Smile.


This one below, never gets old.

Our motto at 125:

Another version:

These have become crowd favorites:


Great for upcoming Valentine's Day:

And will always be if you can continue to turn things like this $15 hunk of junk:

Into a new side table for my parlor:

Retrofitted with leftover pallet boards once again. Oh, the things you can do with them boards!

Thought I'd do a quick tutorial on putting them together. I started by using an exacto knife to cut through the seams of old vintage baseballs that I found at Burley Park antique show this summer. This is surprisingly easy to do and the leather just strips away like you're peeling an orange. It looks like this when you're done.
And this:

Paint a board or in my case, talk your husband into nailing together box type sign boards to give it a little more dimension: Here's an example of just a simple painted board, creamy white and distressed/aged with stain slightly:

Place the baseball strips (you'll need three pieces) from 2 balls into the shape of a flower and secure using a wooden knob. (Again, this is a job for my trusty assistant).
For the lettering, I printed a saying using a font size that would work for the size board that I had. This I traced onto the board using carbon paper.

Front side:

Back Side:
This side should be facing up...black side down as you trace.

Using a pen, outline the lettering by pressing gently and tracing.

Here's how it transfers:

Using a paint pen (you can get these at Hobby Lobby, Michael's or pretty much any craft store, color in your letters-and yes, it's important to color within the lines here! :)

Here's the finished product:


I'm bringing these and lots of signs to my booth tomorrow. Looking forward to more spring related projects to warm that space and your heart! :) Comments...

